
 por
por Python Turtle Graphics es una implementación del clásico lenguaje de la tortuga en Python el cual muestra un triangulo o la figura de una tortuga en un tablero gráfico y realiza desplazamientos pintando el tablero en base a las instrucciones dadas. Para usarla hay que abrir el interprete de comandos de Python y escribir import turtle:
import turtleEl tablero se mostrará al realizar el primer movimiento de la tortuga, para realizar esos movimientos se usan comandos a los que se les pasa un valor entero o flotante que indican el giro o la distancia a recorrer. La forma de la tortuga por defecto es un triangulo pero se puede cambiar, se puede averiguar la forma actual y luego cambiarla a una tortuga con el siguiente comando:
turtle.shape()
'classic'
turtle.shape('turtle')
turtle.shape()
'turtle'
Los giros de la tortuga se realizan con los comandos turtle.left(grados) y turtle.right(grados).
El siguiente comando gira la tortuga 90º a la derecha.
turtle.right(90)Con el comando turtle.forward(distancia) se puede hacer que la tortuga vaya hacia adelante, salvo que el valor sea negativo en cuyo caso irá hacia atrás. Para realizar el movimiento contrario se usa turtle.backward(distancia). Se podría dibujar un cuadrado de 100 x 100 usando los comandos mostrado hasta ahora, de la siguiente forma:
import turtle
turtle.shape('turtle')
turtle.right(90)
turtle.forward(100)
turtle.left(90)
turtle.forward(100)
turtle.right(90)
turtle.backward(100)
turtle.left(90)
turtle.backward(100)
Se podría haber dibujado el cuadrado simplemente girando 90º grados y recorriendo la distancia hacia adelante 100 pixeles pero de esta forma además de los giros se ha usado visto también el funcionamiento del comando backward.
Con un bucle for se usan menos instrucciones, cómo se puede observar en la figura 1.
import turtle
turtle.shape('turtle')
for x in range(4):
… turtle.forward(100)
… turtle.right(90)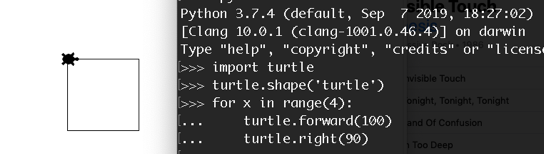
Se borra el resultado con turtle.clear() como en el siguiente código:
turtle.clear()
for x in range(4):
…     turtle.left(90)
…     turtle.forward(100)
El resultado es otro cuadro en diferente posición. Se puede dibujar un círculo con el comando
turtle.circle(radio).
import turtle
turtle.shape('turtle')
turtle.circle(90)
Existen muchas mas funciones, para conocerlas y saber como funcionan se puede usar la ayuda help() de la siguiente forma:
import turtle
help(turtle)
Con este comando se verá la ayuda general de turtle, con lo que es posible tomar una idea general de qué es este módulo y para qué sirve. Con dir() se puede obtener información sobre los distintos componentes del módulo.
dir(turtle)
['Canvas', 'Pen', 'RawPen', 'RawTurtle', 'Screen', 'ScrolledCanvas', 'Shape', 'TK', 'TNavigator', 'TPen', 'Tbuffer', 'Terminator', 'Turtle', 'TurtleGraphicsError', 'TurtleScreen', 'TurtleScreenBase', 'Vec2D', '_CFG', '_LANGUAGE', '_Root', '_Screen', '_TurtleImage', 'all', 'builtins', 'cached', 'doc', 'file', 'forwardmethods', '__func_body', '__loader', 'methodDict', '__methods', '__name', 'package', 'spec', '__stringBody', '_alias_list', '_make_global_funcs', '_screen_docrevise', '_tg_classes', '_tg_screen_functions', '_tg_turtle_functions', '_tg_utilities', '_turtle_docrevise', '_ver', 'addshape', 'back', 'backward', 'begin_fill', 'begin_poly', 'bgcolor', 'bgpic', 'bk', 'bye', 'circle', 'clear', 'clearscreen', 'clearstamp', 'clearstamps', 'clone', 'color', 'colormode', 'config_dict', 'deepcopy', 'degrees', 'delay', 'distance', 'done', 'dot', 'down', 'end_fill', 'end_poly', 'exitonclick', 'fd', 'fillcolor', 'filling', 'forward', 'get_poly', 'get_shapepoly', 'getcanvas', 'getmethparlist', 'getpen', 'getscreen', 'getshapes', 'getturtle', 'goto', 'heading', 'hideturtle', 'home', 'ht', 'inspect', 'isdown', 'isfile', 'isvisible', 'join', 'left', 'listen', 'lt', 'mainloop', 'math', 'mode', 'numinput', 'onclick', 'ondrag', 'onkey', 'onkeypress', 'onkeyrelease', 'onrelease', 'onscreenclick', 'ontimer', 'pd', 'pen', 'pencolor', 'pendown', 'pensize', 'penup', 'pos', 'position', 'pu', 'radians', 'read_docstrings', 'readconfig', 'register_shape', 'reset', 'resetscreen', 'resizemode', 'right', 'rt', 'screensize', 'seth', 'setheading', 'setpos', 'setposition', 'settiltangle', 'setundobuffer', 'setup', 'setworldcoordinates', 'setx', 'sety', 'shape', 'shapesize', 'shapetransform', 'shearfactor', 'showturtle', 'simpledialog', 'speed', 'split', 'st', 'stamp', 'sys', 'textinput', 'tilt', 'tiltangle', 'time', 'title', 'towards', 'tracer', 'turtles', 'turtlesize', 'types', 'undo', 'undobufferentries', 'up', 'update', 'width', 'window_height', 'window_width', 'write', 'write_docstringdict', 'xcor', ‘ycor']
Si puede obtener ayuda mas concreta sobre algún método escribiendo help(turtle.nombre_método) como en el siguiente código en el que aparecerá la ayuda del método pencolor.
help(turtle.pencolor)En este caso concreto, la ayuda sobre el método pencolor de turtle muestra lo siguiente:
Help on function pencolor in module turtle:
pencolor(*args)
    Return or set the pencolor.
Arguments:
Four input formats are allowed:
  - pencolor()
    Return the current pencolor as color specification string,
    possibly in hex-number format (see example).
    May be used as input to another color/pencolor/fillcolor call.
  - pencolor(colorstring)
    s is a Tk color specification string, such as "red" or "yellow"
  - pencolor((r, g, b))
    *a tuple* of r, g, and b, which represent, an RGB color,
    and each of r, g, and b are in the range 0..colormode,
    where colormode is either 1.0 or 255
  - pencolor(r, g, b)
    r, g, and b represent an RGB color, and each of r, g, and b
    are in the range 0..colormode

If turtleshape is a polygon, the outline of that polygon is drawn
with the newly set pencolor.
Example:
>>> pencolor('brown')
>>> tup = (0.2, 0.8, 0.55)
>>> pencolor(tup)
>>> pencolor()
‘#33cc8c'
Así que si por ejemplo se pretende pintar un gran ocho de color rojo, se debe cambiar el color y hacer con dos círculos rojos con el siguiente código como se muestra en la figura 2:
import turtle
turtle.shape('turtle')
turtle.pencolor('red')
turtle.circle(60)
turtle.right(180)
turtle.circle(60)